Professional SEO Logo


>> Client Login

Email:
Password:
Home Services Contact Us Portfolio Mission Search Site Blog  
                 

April 27, 2012

How Google Sitelinks Work

Filed under: SEO and SEM — rossm @ 2:55 pm

The sub links shown beneath a Google search result are known as sitelinks (see image below).  What isn't as well known is how and why sitelinks are created, and what you can do about changing them once they've appeared for your page.

Google Sitelinks Example

Currently, Google sitelinks are 'automatically' created.  Google analyzes the structure of your site and creates links they think will save users time in finding the information they are looking for.  Of course, if Google isn't able to find your pages, they aren't going to create any sitelinks - so having an updated and accurate sitemap is probably the most important thing to take care of first.

Although you can't currently set your own sitelinks (this feature may be rolled out via Google's Webmaster Tools at a later date), you can use some 'best practices' to push Google in the right direction.  Linking to important pages from within your own site seems to garner results, especially when anchor text and alt tags are used correctly - meaning keep them informative, brief, and don't "stuff" them into your page.

At the end of the day, Google really is trying to provide the most useful information.  So by creating a site geared towards helping users navigate your site efficiently, you'll organically be helping the crawler decide which pages are important.  The more you try to cheat the system, the more you'll probably just confuse Google, or worse, they'll penalize you in the results.

If for some reason the sitelinks showing up for your page are wrong or not exactly what you'd like - you can demote them through Webmaster Tools.

To demote a sitelink URL:

  1. On the Webmaster Tools Home page, click the site you want.
  2. Under Site configuration, click Sitelinks.
  3. In the For this search result box, complete the URL for which you don't want a specific sitelink URL to appear.
  4. In the Demote this sitelink URL box, complete the URL of the sitelink you want to demote.

For more information about our proven SEO strategies call us at 1-800-975-5695.

Kind regards,

SlickRockWeb Inc. a leading provider of affordable SEO services - "Bringing you business one click at a time."


April 26, 2012

Improving Word Press page load speed

Filed under: SEO and SEM,Wordpress Tips and Tricks — rossm @ 1:35 pm

With each new Google ranking algorithm update - it's becoming increasingly important to optimize websites for page load times.  Wordpress websites, especially pages using a lot of plugins, can be notoriously slow.  Luckily, there's a few tweaks you can do to help speed things up.

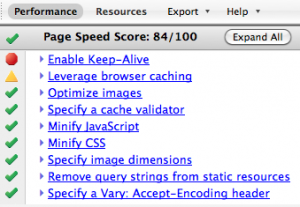
To improve the Page Loading metric, especially on Word Press sites, sometimes the "Keep-Alive" setting should be enabled or improved.

In the php.ini configuration file you can change the following to improve the "Keep-Alive" connections.

increase word press page loading

Change:

; Default timeout for socket based streams (seconds)
default_socket_timeout = 60

to:

; Default timeout for socket based streams (seconds)
default_socket_timeout = 600

Instead of changing the default settings of the php.ini file, one can also use the ini_set() function which can be defined within the PHP page code. All you do is change it to a really long amount of seconds, at least 600 seconds and the connection will not close, when trying web page send/recv commands.

ini_set( 'default_socket_timeout', 600);

April 25, 2012

Restricting WordPress Plugins Access Levels

Filed under: Wordpress Tips and Tricks — Eric @ 9:46 pm
If you are handing off your wordpress sites to clients and giving access as an editor login, you might want to think about restricting access to some of your plugins and plugin settings. One such plugin called 'Hana Code' has overly lacks security and potentially allows a client to change code entries or worse inject new PHP code into the site. If the client doesn't know what they are doing this could be devastating to the site.
So for example the Hana Code plugin could be modified so it would not be accessible to logins below an administrator level.
Change line 109 of 'hana-code-insert.php' file.

add_options_page($this->admin_setting_title,$this->admin_setting_menu, 1, __FILE__,array(&$this,'hana_code_options_page'));

To:

add_options_page($this->admin_setting_title,$this->admin_setting_menu, 8, __FILE__,array(&$this,'hana_code_options_page'));

Note the only change would raising the access level number from '1' to '8'.
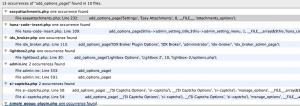
You can potentially make this modification on other WordPress plugins as well. We did a simple content search of our wordpress files for the string "add_options_page(". Below are some of the results we found.
Then in the array line of code you could look for the following ", <a number>, __FILE__,"
If you see something like ", 1, __FILE__," you might want to change the 1 to an 8 which would only allow Admistrators or higher access to the Plugin settings.
Hope this was helpful for everyone.

April 19, 2012

WordPress Visual Editor Not Working?

Filed under: Wordpress Tips and Tricks — rossm @ 1:40 pm

The more time you spend with WordPress, the more likely it is that you'll run into an instance of the visual editor not working.  While it's possible to make all the necessary changes to your page in the html editor - the fix is easy enough there isn't any reason not to do it.

If you're looking to restore functionality to the visual editor, just follow these steps:

  • Connect to your ftp
  • Download (and backup) your wp-config.php and add this line of code at the bottom of the file before the “require_once” line.
    define('CONCATENATE_SCRIPTS', false );
  • Save. Upload the new wp-config.php to your ftp. Now refresh your wordpress page and you should see the Visual Editor now.